杨磊的博客主站,搜罗全网有用的小资源!
MicroPython_ESP8266_IoT——第三回 纸上得来(学习手册知识点)

第三回 纸上得来(学习手册知识点)
已经会使用UART prompt进行MicroPython在ESP8266模块上的使用了,即将解锁众多玩法。
本系列是想通过ESP8266做IoT设备,就先来挖掘“物”的使用,学习ESP8266模块配合MicroPython常用的外设驱动。
核心时钟
可以通过模块machine,对CPU核心时钟进行修改,默认是80MHz,可超频
至160MHz:
import machine
machine.freq() # get the current frequency of the CPU
machine.freq(160000000) # set the CPU frequency to 160 MHz没有尝试过最高多少,一般情况下,当然是设定为160 MHz,速度快用起来才爽。
可以通过模块esp,打开或关闭调试信息重定向(此处默认应为打开):
import esp
esp.osdebug(None) # turn off vendor O/S debugging messages
esp.osdebug(0) # redirect vendor O/S debugging messages to UART(0)网络链接
用ESP8266模块,那联网的功能肯定不能少,网络链接模块工作方式在network中。
其中wlan可以工作在STA_IF和AP_IF两种状态,STA_IF状态可以通过connect方法输入WIF账号和密码连接到网络;AP_IF状态可以创建名称特定的热点。
import network
wlan = network.WLAN(network.STA_IF) # create station interface
wlan.active(True) # activate the interface
wlan.scan() # scan for access points
wlan.isconnected() # check if the station is connected to an AP
wlan.connect('essid', 'password') # connect to an AP
wlan.config('mac') # get the interface's MAC adddress
wlan.ifconfig() # get the interface's IP/netmask/gw/DNS addresses
ap = network.WLAN(network.AP_IF) # create access-point interface
ap.active(True) # activate the interface
ap.config(essid='ESP-AP') # set the ESSID of the access point可以通过下面这种方式连接到本地的WIFI网络:
 def do_connect():
     import network
     wlan = network.WLAN(network.STA_IF)
     wlan.active(True)
     if not wlan.isconnected():
         print('connecting to network...')
         wlan.connect('essid', 'password')
         while not wlan.isconnected():
             pass
     print('network config:', wlan.ifconfig())
上述程序中需要替换essid为要连接的WIFI名称,替换password为要连接的WIFI密码。
一旦网络连接建立,socket模块就可以被创建使用。
后续设计中可以先以AP_IF方式,输入需要链接的WIFI账号和密码,再以STA_IF方式接入网络。
延时和时间
可以使用time模块:
import time
time.sleep(1) # sleep for 1 second
time.sleep_ms(500) # sleep for 500 milliseconds
time.sleep_us(10) # sleep for 10 microseconds
start = time.ticks_ms() # get millisecond counter
delta = time.ticks_diff(time.ticks_ms(), start) # compute time difference模块中延时参数是可以传输float(小数)类型。
引脚和GPIO
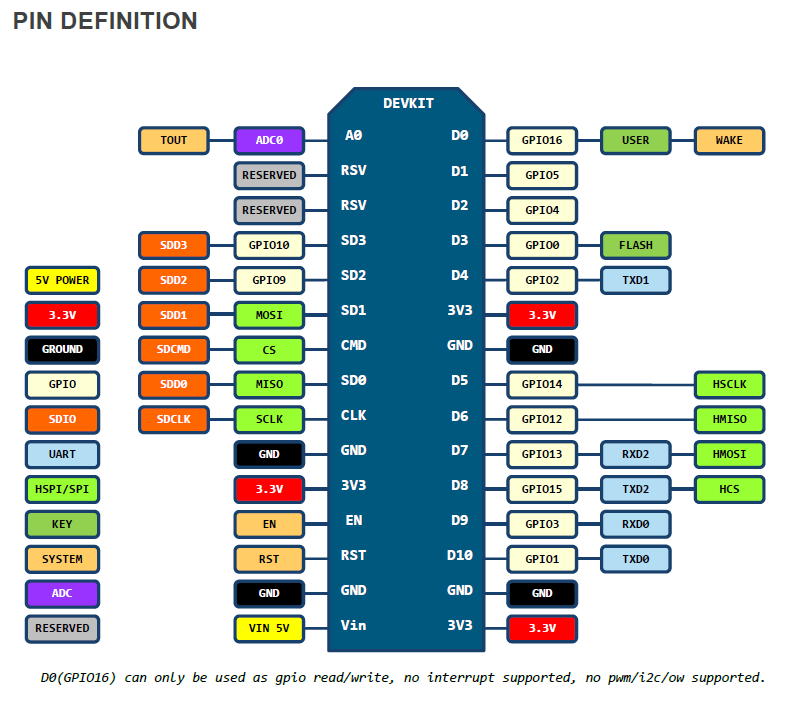
可以使用machine.Pin类:
from machine import Pin
p0 = Pin(0, Pin.OUT) # create output pin on GPIO0
p0.on() # set pin to "on" (high) level
p0.off() # set pin to "off" (low) level
p0.value(1) # set pin to on/high
p2 = Pin(2, Pin.IN) # create input pin on GPIO2
print(p2.value()) # get value, 0 or 1
p4 = Pin(4, Pin.IN, Pin.PULL_UP) # enable internal pull-up resistor
p5 = Pin(5, Pin.OUT, value=1) # set pin high on creation这个类就定义引脚输入和输出类型,仔细观察发现还可以设定内部上拉。
通过配置GPIO控制LED点亮和熄灭,在前面已经了解过了;能够配置GPIO高低电平,那么后面的操作就是锦上添花了。
PWM
PWM可以在除了PIN(16)的所有Pin使用。所有通道都有一个频率,从1 Hz到1000 Hz,占空比
从0 到 1023;
使用machine.PWM类:
from machine import Pin, PWM
pwm0 = PWM(Pin(0)) # create PWM object from a pin
pwm0.freq() # get current frequency
pwm0.freq(1000) # set frequency
pwm0.duty() # get current duty cycle
pwm0.duty(200) # set duty cycle
pwm0.deinit() # turn off PWM on the pin
pwm2 = PWM(Pin(2), freq=500, duty=512) # create and configure in one go通过调节占空比,可以调整pin 2上连接的LED灯的亮度。如果进行合理的时间搭配,还可以达到呼吸灯的效果:
import time, math, machine
led = machine.PWM(machine.Pin(2), freq=1000)
def pulse(l, t):
for i in range(400):
l.duty(int(math.sin(i / 200 * math.pi) * 500 + 523))
time.sleep_ms(t)
def fading():
for i in range(50):
pulse(led, 5)可以看一下实际效果图GIF:

可以通过调整sin函数的系数,来调节呼吸的频率;通过调节占空比的基础数值(上述程序中为523),来调节亮,灭的时间范围;
其他
后面还有其他的类和方法,都是接口相关的,想要等到后面有小制作的时候,再结合实物,详细的说明。
如果感兴趣,可以根据官网的教程走一遍,内容有ADC,SPI bus,I2C bus,RTC,Deep-sleep mode,OneWire driver,NeoPixel driver,APA102 driver,DHT dirver

公司专车送货上门
高效速度,我们可以专车送货上门

全年无休,半夜值班
客户您想怎么联系就这么联系我们

售后无忧,专业团队上门服务
全程为您护航保驾,让您全身心投入工作

为您提供专业咨询和服务
24小时为您答疑解惑,指导安装


